The simple, practical (although not entirely accurate) answer is that for a normal sized print, you’ll need a 2Mb or more *.jpg image.
Unfortunately, it doesn’t work like that.
There is no direct connection between file size and either file resolution and/or image quality, so the previous, practical answer is really an educated guess; and there are lots of factors that could, potentially, cause this answer to be wrong.
File size is only circumstantially linked to an image resolution, in that, ordinarily, higher resolution images result in larger file sizes than lower resolution ones.
Image resolution is a much more significant factor in determining print quality.
Q. OK then, if file size isn’t significant, what resolution do I need to obtain the best quality prints possible?
Ideally, your image resolution will be sufficient to achieve an output resolution of 300 dpi. How big this is, depends on which size of print you want. Read more.
In practice, image resolutions that are sufficient to achieve an output resolution of around 150 dpi are likely to be acceptable to all but the most discerning viewers.
Anything below 90 dpi is likely to produce unsatisfactory results; but ultimately, whether a particular result is unsatisfactory depends on the image itself and the expectations/requirements of the viewer.
Accordingly, we can only offer you guidelines for minimum resolutions.
Q. Do you have something handy which just happens to show the minimum resolutions you’d recommend for different sized prints?
Funny you should ask exactly that question. It’s almost like it was planned. But, yes. Yes, we do. Here it is:
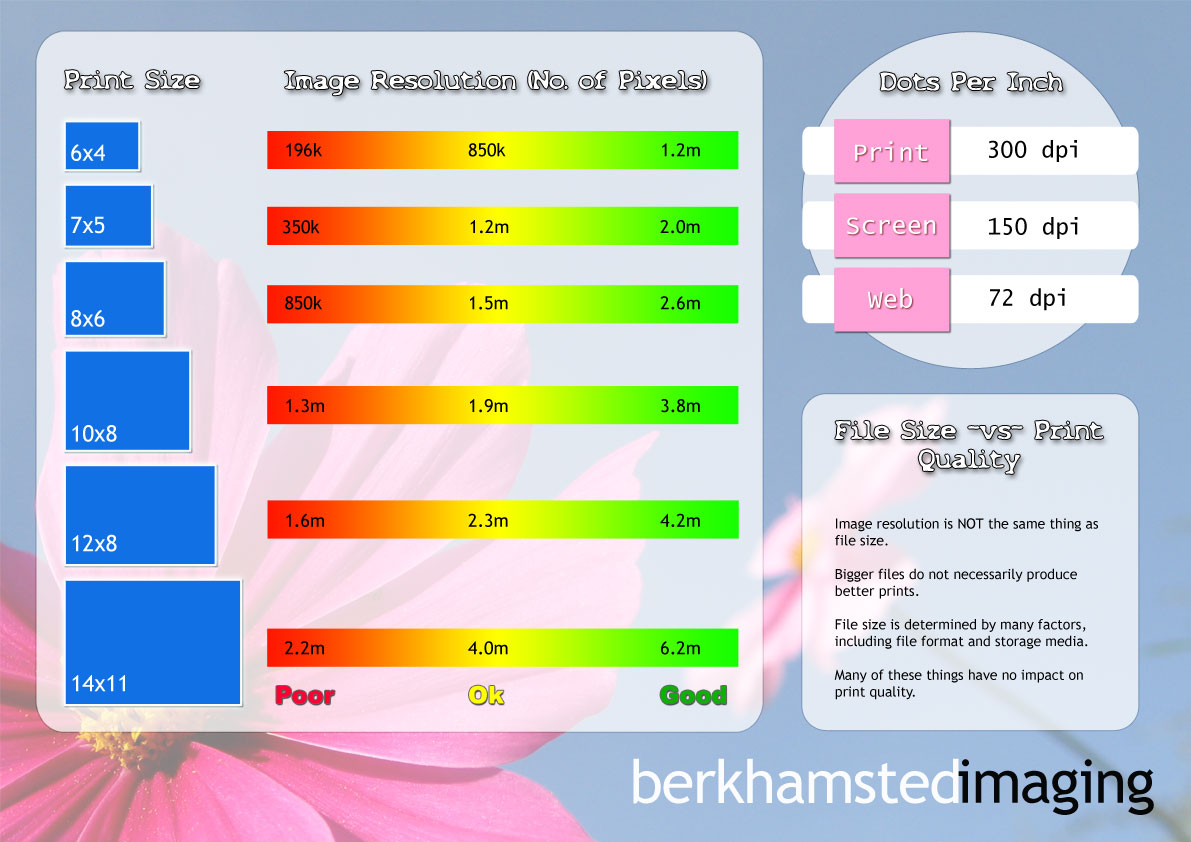
Print sizes and image resolution
The original image was intended to be printed on A3. The image above has been drastically scaled down to make it more suitable for viewing on the web. So, if you're browsing on your phone, or you just want a better view of it, download the PDF here.
Well hopefully, it's pretty self explanatory.
On the left, you have a list of standard photo print sizes from 6x4 to 14x11 and next to each size is a bar which is marked with 3 sizes. The sizes are the number of pixels, i.e. the image resolution at which the prints of that size will produce a poor, OK or good quality print. Accordingly, ideally you'd always be printing images whose resolution is in the green zone.
The most important things to realise are:
- These numbers are generalisations. A picture taken with a good camera with exceptional optics may, in practice, produce a better print than one taken by a poor camera, even if the poor camera's image has a higher resolution.
- The number of pixels, i.e. the image resolution, is what matters. Not the file's size in Mb.
As high as possible.
When pictures are printed at poster size, any flaw in them will be magnified. Accordingly, image quality is very important.
However, very few pictures will have the necessary image resolution to achieve an output resolution of around 300 dpi when printed at poster sizes. Therefore, it is almost always necessary for us to create a 2nd image (based on your original) specifically for the purpose of producing a poster sized print, which has been tailored to meet the individual image and your own, particular requirements.
This explains why so many diy/online poster size prints go horribly wrong. If you upload a 640kb picture of your niece (which looks fine on your 15inch laptop) to a Web Server 100s or 1000s of miles away and an automated process sends it on to a poster printer, chances are, you’ll get back an A2 sized bit of paper that is only fit for the recycling.
Every image is, and every customer’s needs are, subtly different. Therefore, we’ll always review your image, discuss you what you want to achieve and, if you want, prepare a proof strip before going to print on the final. That way, you can be sure of the quality of your print.
If your picture has flaws, resolution doesn’t matter much.
The flaws will be reproduced in the print, because they are present in the picture. They will exist regardless of its image or print resolution.
BTW. Some people find this a difficult idea to grasp at first… but it makes sense when you realise that the flawed image IS the image. An analogy may help. If you take a picture of your car while it is dirty, cleaning your camera lens won’t make your car look any cleaner in the photo. (In fact, cleaning the lens will make the dirt on the car more apparent.)
Accordingly, it doesn’t really matter whether 30 or 300 dots are used to reproduce each inch of the pixellated part of your image… it will still look pixellated. Technically, the 300 dpi version would be a more accurate reproduction… but it’ll just be more accurately reproducing the pixellation of the pixellated image.
Q. I’ve got a low resolution image which has a small file size, if I increase the dimensions of the image in my image editing software, it’ll be a bigger file and I’ll get better prints from it, won’t I?
No.
Image editing software can be used increase the physical dimenisions of an image, but it does so, by by either:
- increasing the size of each pixel within the image (“resizing”) or
- adding extra pixels into the image by calculating what the new pixels “ought” to be based on the average of the colours of neighbouring pixels (“resampling”)
Neither method can or will improve the clarity or quality of the image.
In fact, whilst a resampled image will contain more data and thus (in the strictest sense) will have more resolution, the quality of the image will inevitably be degraded by the pixel averaging process.
The principle involved is best illustrated by example.
If you had a picture of chessboard, any pixels which the resampling process “averaged” out would appear as a shade of grey i.e. some part black, some part white. But, there are no grey squares or grey boundaries between squares on a chessboard, so any grey pixels in the resampled image are, objectively, the “wrong” colour.
In practice, with real world images, the limitation of the averaging process is difficult to identify so readily. However, it is there and it will degrade the clarity of the original to some extent.
Accordingly, using software to increase the size of your image will not improve the quality of your prints.
At best, you’ll end up with a bigger version of your image, with the exactly the same resolution as your original image, in a larger file. At worst, the “bigger” version of your image, will take up more space on your computer but actually contain less useful data.
Q. But this pixellated/noisy/low resolution image the only version of the picture I have and I really want a print of it, what should I do?
I’m afraid that your choices are pretty stark. You can:
- Print the image small. The flaws will still be present, but the smaller the print the less obvious they will be.
- Print the image and live with the flaws.
- Try and improve the image in post-production. This may or may not be possible and/or financially viable.
I guess not. How about a swee-e-eet picture of a ickle, wickle fluffy kitten, instead?

"Cute Kitten" by kitty.green66. © Some rights reserved. Used under Creative Commons BY-SA licence.
"I am cute, fear me."