A photo is described as cropped, if a portion of the original image is removed.
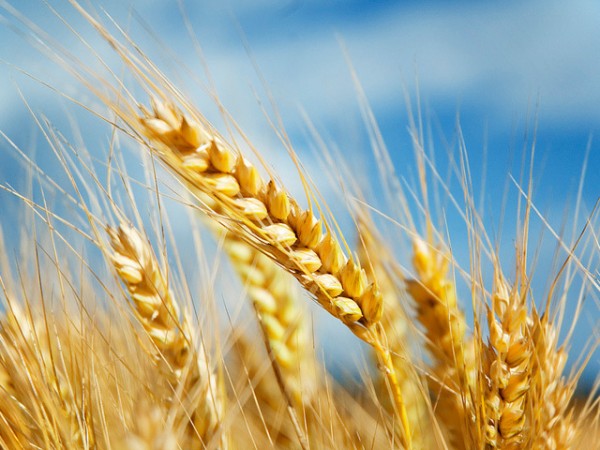
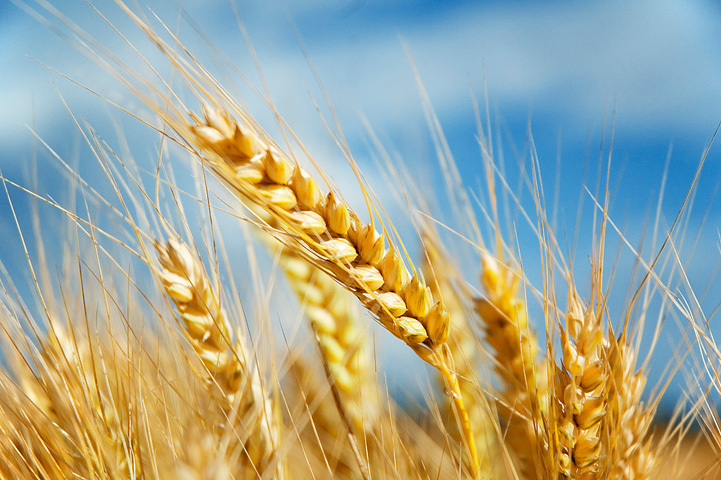
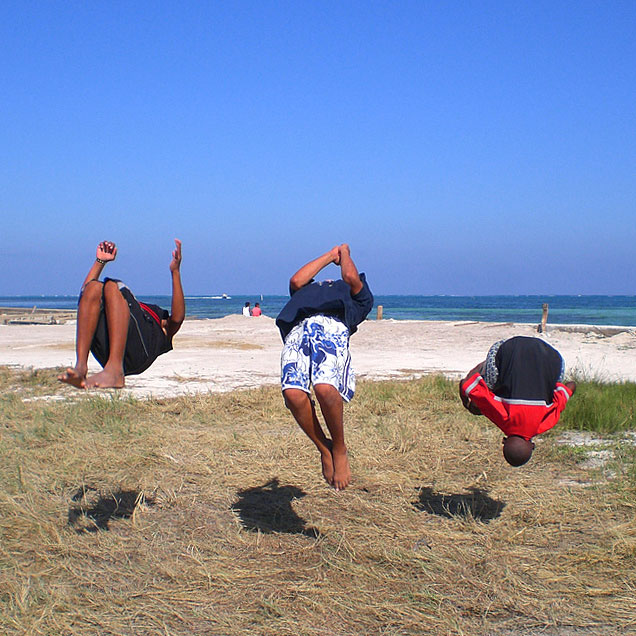
Most pictures you see in print will have been cropped, like this, beautifully crafted, one.

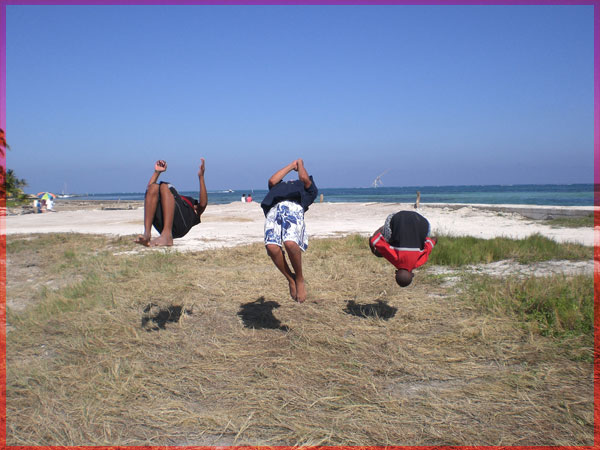
"Flip!" by HaniSham™. © Some rights reserved. Used under Creative Commons BY-NC-SA licence.
Horace was loving his newly installed, ejector step.
Cropping affects the composition of an image.
Even the best photographers find it hard to compose their images, as precisely as they would like, in camera. Whilst not impossible, getting the spatial relationship between the head of the flipping boy and the urn would be very difficult to do in real time, in camera. However, having set up the shot, the photographer could relatively easily and deliberately have chosen to take the shot “wide” and then cropped it, to achieve this result.
Many photographers, especially those working with digital, routinely shoot their images with the intention of adjusting the crop before going to print.
Zooming is the process of enlarging a (smaller) portion of the original image.
Most pictures, that have been cropped, will also have been zoomed.
Cropping and zooming go hand in hand, because a crop i.e. the removal of part of the image, often affects the aspect ratio of the image.
However, an image’s aspect ratio can be maintained, if the uncropped area has the same aspect ratio OR if, after the crop has taken place, the image is zoomed until what remains fills whole of the desired aspect ratio. (In truth, these are 2 methods of acheiving the same result… but thinking about it as a 2 step process i.e. crop then zoom, helps you to understand what is happening).
An Aspect Ratio describes the relationship between the height and the width of an image. (…well, technically, any 2 dimensional shape, but if you were interested in the topographical niceties, you probably wouldn’t be asking the question and we’re only interested in images, here.)
A square image has an aspect ratio of 1:1. Its height is always the same as its width. A circular image also has an aspect ratio of 1:1.
A rectangular image has an aspect ratio which depends on its dimensions.
Aspect ratios are sometimes described by their lowest common denominators, (Yay, fractions!) and sometimes as a mutiplicand of one (Yay, decimal-i-ness). Therefore, a 6x4 print, could be described as having an aspect ratio of 3:2 or alternatively as having an aspect ratio of 1:1.5.
The decimal convention is more widely used; but it can be a bit confusing because the ratio is always described by reference to its shortest side… which gives rise to the correct, but confusing, statement that a portrait 4x6 print has an aspect ratio of 1:1.5; but so does a landscape 6x4 print. It also requires you to visualise decimal relationships, which somehow is harder than whole number ones.
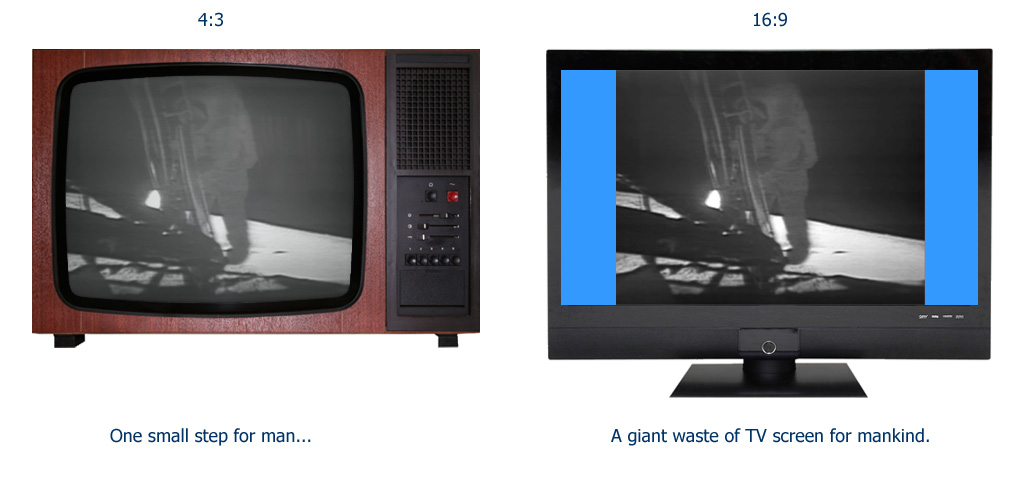
One of the easiest ways to understand why aspect ratios are important to photographers is to think about television.
Back in ye olden telly times, TV’s had an aspect ratio of 4:3. Then, in the 1950’s, cinema remembered that humans’ field of vision is much wider than this and they invented widescreen. Cinemascope films have an aspect ratio of 21:9 because that is the way humans see things.
However, this was a problem for TV, because the manufacturers couldn’t blow 21:9 shaped bubbles out of the glass that they (then) used to make their tellys. So, they stuck with 4:3. Fast forward, half a century and TV manufacturers finally managed to catch up… and that’s why tellys went widescreen (although telly widescreen is, still, only 16:9).
Well, if you watch an old TV program, like the news footage of Moon landing, on your widescreen TV, you’ll see black bars on the left and right sides of the screen.
This is because the aspect ratio of the original broadcast was 4:3 (aka 12:9). This is a narrower aspect ratio than your current 16:9 widescreen TV and therefore the image does not fill the whole of your screen.
The difference between these two different aspect ratios cannot be masked (without deforming the original image).
So now, and forever more, every time you see Neil’s one small step for man, he’ll have two bars of unused screen real estate on either side of him… (and you’ll never get to see the Little Green Man that was standing just to the left of shot and who would have been clearly visible, if only it had all been shot in widescreen.)
Because, photographs have an aspect ratio… and the prints of photographs have an(other) aspect ratio.
The aspect ratio of film depends on what type of film you are using. The most common sort of film, 35mm, has an aspect ratio of 3:2.
The aspect ratio of a digital image depends on the type of camera and its settings. However, except Digital SLRs, the majority of digital cameras capture images with an aspect ratio of 4:3.
If you want to avoid unwanted cropping, e.g. heads and feet being cut off etc. you need to understand the relationship between the aspect ratio of the images you take and the aspect ratio of the print sizes you want.
Yeah, feel free.
Don’t worry, if you fell asleep immediately after I said “Yay fractions”. The vast majority of images can be made to fit, perfectly nicely, into the standard print sizes. You can either leave us to sort this out… or if you want to do it for yourself you can carry on reading.
This is the most frequently asked question of all the frequently asked questions in our world.
…and the answer is…
it depends on whether the aspect ratio of your cropped image is the same as the aspect ratio of the print you want.
You can calculate the aspect ratio of the images from your camera.
Either, look in your camera’s manual/settings for the image resolution you are using or get a bit of software to display the image properties of one of your images. Make a note of the images' height and width in pixels. Get a calculating machine out (or use the one your sitting in front of). Divide the larger number by the smaller one.
e.g. Will an 2048x1536 image be cropped, if printed 8x6?
Image Width / Image Height = Image Aspect Ratio
               2048 / 1536 = 4:3

Print Width / Print Height = Print Aspect Ratio
                     8 / 6 = 4:3
                           = Image will not be cropped
However, if we wanted to print the image on a 6x4...
Print Width / Print Height = Print Aspect Ratio
                     6 / 4 = 3:2
                           = Image will be cropped
Maths homework aside, the important things to realise are:
- Not all standard photo print sizes have the same aspect ratio.
- Images and prints of different physical sizes can have the same aspect ratio. For example,
- The aspect ratio of a 6x4 print is 3:2.
- The aspect ratio of a 18x12 print is also 3:2.
If you're really interested in this and would like avoid doing some of the maths, yourself, you might find our aspect ratios table helpful.
When you ordered your prints, you may have chosen the option to print them with white borders. Some people like this. It makes your images look more photo-y. It’s particularly nice for albums.
If the border is the same size all the way round the image, you choose the option to print them with white borders.
If the borders appear only at the top and bottom or only on the left and right of the image, the most likely explanation is that the aspect ratio of the digital image does not match the aspect ratio of the print size you ordered.
This can happen, even if you haven’t deliberately changed the aspect ratio of the digital image, because digital cameras, generally produce images with an aspect ratio of 4:3, but not all traditional photo print sizes have this aspect ratio.
A 4:3 image does not fit on 6x4 print; nor does it fit on a 7x5 print. (It’s the Missing Little Green Man phenomenon, again.)
Q. This seems silly. Why don’t the digital cameras produce images that fit traditional photo print sizes?
There’s a number of reasons, the most important of which are:
- 4:3 used to be the standard aspect ratio for computer monitors (before the world went widescreen) and
- The “excess” part of the digital 4:3 image allows the (cropped) image to be printed edge to edge, without requiring the camera’s electronics to be pixel perfect, edge to edge.
Essentially, back in the days when digital camera standards were being decided, the squarer aspect ratio of digital images was deliberately adopted by the industry as a margin for error and to ensure that prints weren’t compromised by pixels at the very top and bottom of the image produced by the camera.
No. You’ll only “lose” parts of your image, if:
- The aspect ratios of the image and the print do not match; and
- When you print the images, you instruct the printer to “fill” the print.
However, if you ensure the image’s aspect ratio and the print match, there won’t be anything lost in the print. For example, as we’ve already described, the default aspect ratio of most digital cameras (being 4:3) will print full frame (i.e. without any crop) on an 8x6 print.
Well, almost nothing.
All edge to edge prints are printed with a tiny zoom (less than 1% per side) to ensure that the printed image fills the paper, perfectly. If no zoom whatsoever look place even the smallest amount (less than 100th of a degree) of paper misalignment would create noticable print errors.
In practice, the zoom on edge to edge prints, is not significant for photos.
It can, however, be significant for people doing post-production work on photos. For them, the answer is simple. If you’re going to print edge to edge, don’t put anything important within 2% of the margin of your image.
Yes, of course. Stick with it. There’s cheesecake at the end.
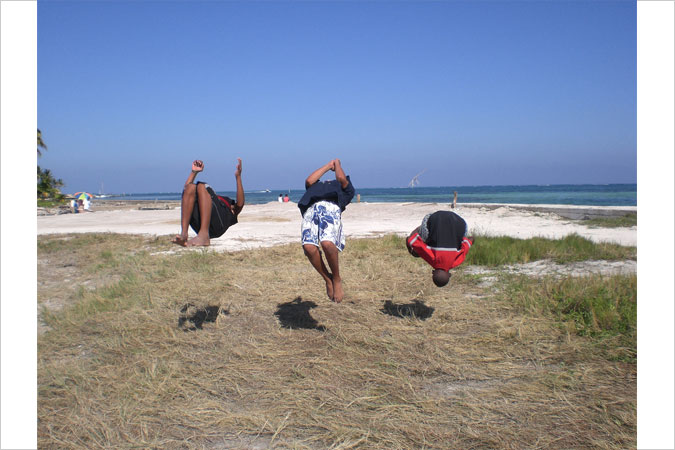
Image 1: This is our Original image. It has an aspect ratio of 4:3.

"Wow" by tacogirl. © Some rights reserved. Used under Creative Commons BY licence.
Original Image. 4:3
I’ve specifically choosen this image because it does not appear to have been cropped before being uploaded and because the subject matter is in the centre of the image, so the composition of the image doesn’t confuse the following…
Let’s assume we want to make a 6x4 print this image.
A 6x4 print has an aspect ratio of 3:2 and this is different from our original 4:3 image. Therefore, we need to try to understand how this will affect the way our final print will look.
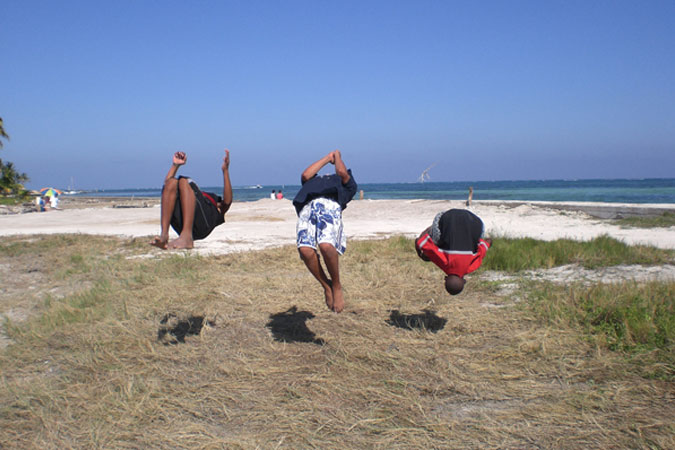
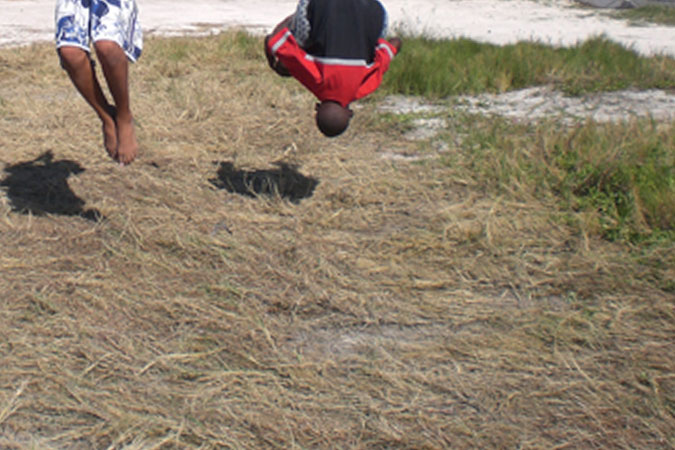
Image 2: Here’s the same image with the largest possible 3:2 rectangle that can be placed within the original image. I've coloured it green, so its obvious. The red bars show the portion of the original 4:3 image which cannot be displayed in a 3:2 rectangle.
Image 3: Here’s the same image with the smallest possible 3:2 rectangle which covers the whole of the image. Again., I've coloured it green, so its obvious. This time. there are no red bars, because all of the original 4:3 image would displayed. However, this 3:2 rectangle is bigger than the original image.
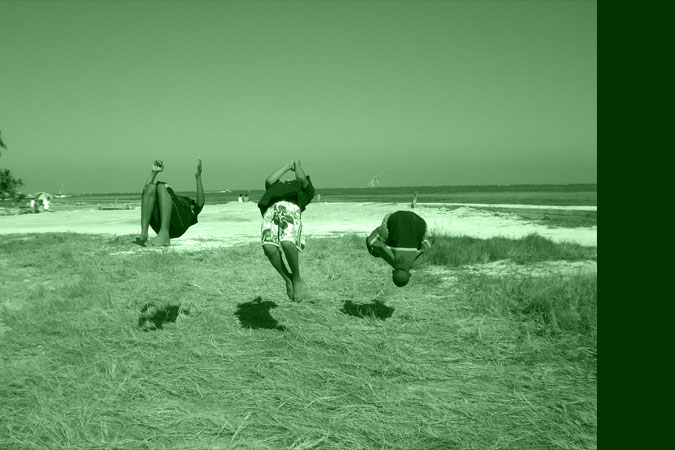
Image 4: If we were to print our image, like this, so that the whole of the original was visible, the piece of paper would (have to be) larger than the image... and, once the image was centred, it'd look like this.
The white areas represent the portion of the photo paper, that would have nothing printed on it.
Accordingly, if you print an original 4:3 image on a 6x4 piece of paper, you can either:
- Lose a bit from the top and bottom of your image or
- Have white borders on the sides of your image.
The physics isn’t up for negotiation, no matter how much you’d like it to be.
No.
No zoom has taken place in either Images 2, 3 or 4. The flippin' kids are exactly the same size in all these versions of the image; and they are all same as the original.
The only thing about Image 3 that makes it appear larger than Image 2 is that it includes the data that is “lost” behind the red bars. Additionally, of course, the rectangles are different sizes… and, in the real world, this would translate to different sized prints.
Therefore, in order to avoid your 4:3 image having a large area of unprinted space on it, when you print it at 6x4, you need to take the crop from Image 2 and then zoom into the image until the cropped portion of image, fills the whole of the print.
Image 5: This is what the zoom does.
As you can see, this cropping and zooming process, results in an image which has both, a different aspect ratio and different sized elements (e.g. the flippin' kids are bigger now).
However, once you appreciate, that image 5, is exactly the same image as image 2 (inside the green rectangle), just at a different scale, you've pretty much understood how cropping and zooming works.
Q. So, if my aspect ratios don’t match, my choices are to print the image to fit the paper, like image 4 OR to print the image to fill the paper, like image 5, right?
Yep, that’s right.
And, cleverly, you even used the right terminology.
Images, like image 4 are referred to as having been cropped to fit, whereas images, like image 5 are referred to as having been cropped to fill.
Q. Fair enough, but looking at the two images, the only thing cropped out of image 5, is a bit of sky and a bit of grass… and I don’t really care about them. So, obviously, I’d always want to my prints to fill the paper, right?
Not necessarily.
Most of the time, you will want your images cropped to fill.
However, if you remember, at the very beginning, I said that cropping affects the composition of an image. The flippin' kids image may benefit from being cropped to fill. However, this is not the case for all images.
Image 6: This 4:3 image, for example, would not be easy to crop onto a full frame 6x4 print[1] and produce a satisfactory result;

"Joy" by gemsling. © Some rights reserved. Used under Creative Commons BY licence.
A 4:3 image that's difficult to crop nicely to fit a 6x4 print
because no matter how you position a 3:2 rectangle within this image, some important part of the image e.g. the girl’s eye or the boy’s jaw line/mouth, would be lost.
Image 7: Centred crop
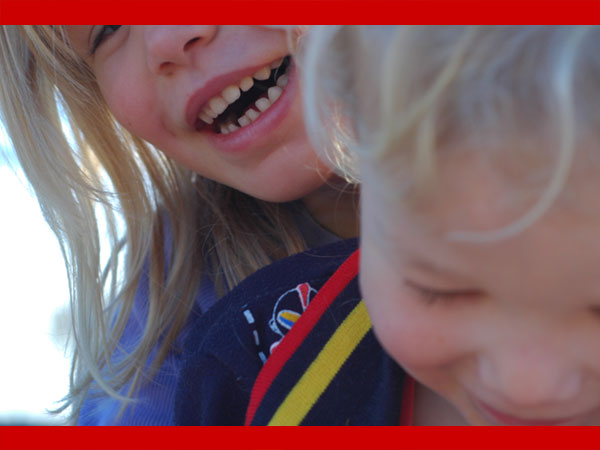
Image 8: Bottom only crop
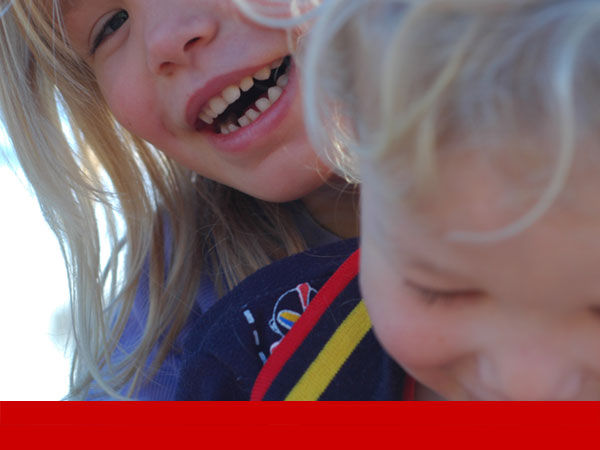
Image 9: Top only crop
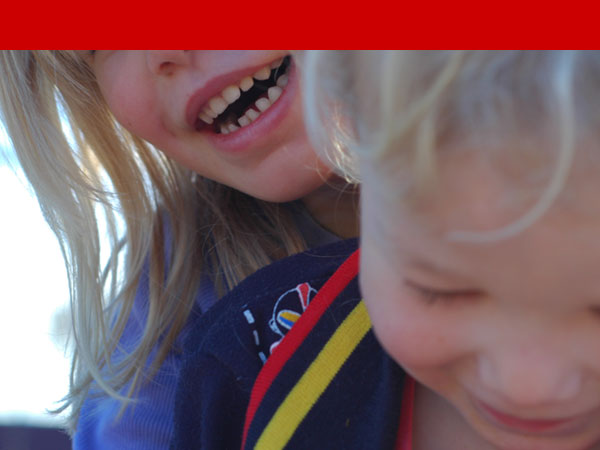
Of these 3 potential crops, Image 8 is probably the least unsatisfactory; but all of them represent a significant compromise over the original image.
To get the best from an image like this, you'd need to either:
- Pick a print size with an aspect ratio that matches your image OR
- Print the image cropped to fit.
Q. Earlier, you said something about a small zoom being applied to all edge to edge prints. How does that work?
All images, regardless of whether they are cropped to fit or cropped to fill a print, will have a small amount of zoom applied to them, to ensure they print correctly.
Image 10: The red border here illustrates the area affected by the zoom applied to edge to edge prints.
Actually, this is probably a bit of an over-statement, the border shown is proportionately a little larger than what you would get on a print in the real world… but I couldn’t make it any smaller and it still be illustrative on screen.
Cropping is an art, not a science.
The general rule is you should crop out anything which is unnecessary; but leave everything in that is necessary.
However, ultimately, a crop is an artistic decision.
For example, artistically speaking, I’m not sure this crop is an improvement and it certainly conveys something entirely different from the original image…
and you can see that to acheive it I had to apply, a butt-load[2] of zoom... and that this has started to pixellate the image, as there is not enough resolution in our (working) copy to do this without degrading the image.
Conversely, I think this square crop is, probably, a good idea: because it removes quite a lot of unnecessary background, yet it retains the essence of the image.
Punchy, jumpy and square... Camber Sands' favourite new variety act?
(That said, I’ve cheated a bit, by punching up the colours, straightening up the horizon and removing a distracting artefact from the background).
If you’ve got this far, you’ve earned it.

"Say Cheese!" by dilutedmagnetics. © Some rights reserved. Used under Creative Commons BY-NC licence.
And you thought it was going to be a picture of a vintage hottie, didn't-cha? Shame on you.